
Since growing our own green beans, I can't tell you the last time I purchased green beans at the grocery store. There's really no reason, because our summer garden produces enough green beans that I'm able to preserve enough for year-round eating. Home canned green beans are also tastier, less expensive and have no additives compared to store-bought green beans, so that's a win win in my book.
I am still amazed every year that each little seed that we plant in our backyard garden grows into something that we can preserve. It's always such a blessing for anything that we harvest and there is nothing quite like reaching into your own pantry and pulling out a jar of homegrown food.
Canning can be a lot of work and also very time-consuming, but in the dead of winter when you're enjoying home canned and frozen vegetables that you grew and preserved, it makes it all worth it. If you're new to canning, it can be a little scary and intimidating, especially the thought of using a pressure canner.

When I stared canning, I only water bath canned, but I was forced to face my fear of pressure canning when our garden was overflowing with vegetables that could not be pickled or water bath canned. So, I took the plunge and purchased a pressure canner and, honestly, it has been one of the best purchases I have ever made other than my Instant Pot.
The whole process of pressure canning went easier than I thought it would and by the second time around, I felt pretty comfortable using my pressure canner. So, today I thought I would share with you how I can, my green beans using the raw-pack method. Canning green beans and using this method is perfect for beginners and actually the first thing I canned using my new pressure canner.
Once you get the hang of pressure canning the possibilities are endless. For example, I love to can potatoes, corn, carrots, pinto and kidney beans, chili beans, homemade baked beans, broth, pumpkin, butternut squash and spaghetti sauce. Do you want to can your own garden fresh green beans? Here's how to preserve your harvest.
Once you get the hang of pressure canning the possibilities are endless. For example, I love to can potatoes, corn, carrots, pinto and kidney beans, chili beans, homemade baked beans, broth, pumpkin, butternut squash and spaghetti sauce. Do you want to can your own garden fresh green beans? Here's how to preserve your harvest.

Every year our garden is overflowing with green beans, so normally it takes 2 -3 days of harvesting before I have enough to can. Once I harvest the green beans, I take them inside, soak them in vinegar and water to remove all the debris and then rinse them under cold water, drain and lay them out on a dish cloth to completely dry.
Once they are dry, I pack them in a large plastic container, cover it, and place them in the refrigerator. This keeps the beans nice and fresh while I am waiting for my second round to harvest. Which is usually 2-3 days later.

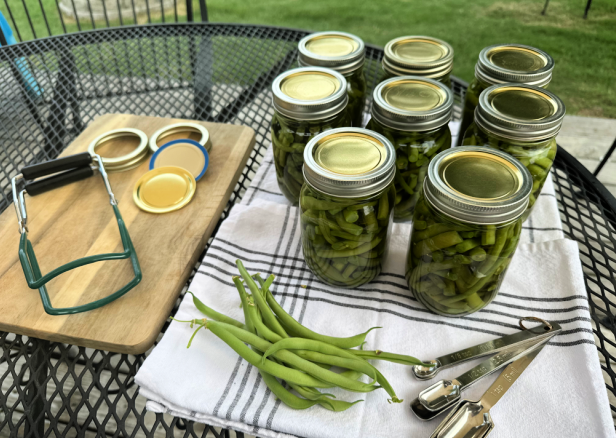
🥣 Here are the Supplies you'll Need:
- Mason jars (pints or quarts)
- Mason Jar lids and bands
- Pressure Canner - I have the Presto 23 Quart Aluminum Canner
- Funnel & Jar Lifter
- Medium sauce pan or bowl (for boiling water for lids & rings )
- Kettle to boil water for beans or a pot can be used with a ladle
- Bubble remover, butter knife, chop stick to de-bubble
- Napkin or paper towel to clean off rims of jars
- Thick dish towel (to place jars on after removing from canner) 💚 Prepare the Jars, Lids, Rings & Canner:

- Gather all of your supplies, jars, rings, lids, etc.
- Clean and sterilize the mason jars by running them through the dishwasher or wash with hot, soapy water and set aside.
- Place the lids and rings in a medium sauce pan and cover with water. Bring the water to a simmer on low and let the lids sterilize. (Ball Canning no longer requires this, but why fix something that isn't broke).
- You can also boil water and pour over the lids and rings that have been placed in a bowl.
- Place the canner rack into the canner pot and fill the canner with 2-3 inches of water (about 3 quarts of water). The water temperature needs to be the same temperature at the jars.
- Place the canner on the largest burner.
- I have a glass top stove and I pressure can on my stove just in case you were wondering.
- Do not mix jar sizes use all pints or all quarts, but not both, because the processing time is different for each size.

💚 Prepare the Green Beans:

- Soak the green beans in a big bowl with 1 capful of vinegar for about 10 minutes to remove any dirt, debris or sprays.
- Drain and rinse the green beans under cold running water.

- Snap off the ends of the bean and cut into 1 - inch pieces.
- Place the funnel on top of jar and add the raw green beans. This method is called the raw - packing.
- Fill the jars full with beans, tapping the bottom of the jars with your hand to move the beans down into the jar. Make sure to pack them well and leave a 1 inch head space.

- Fill the remainder of the jars using the same method as above.

- Add a 1/2 teaspoon salt for each pint size jar and 1 - teaspoon salt for each Quart size jar.

- Add 1 - 50 mg Zinc tables to each jar, optional. Adding a Zinc keeps the green beans green by keeping the pigment - Chlorophyll from coming our of the beans. The Zinc does not alter the taste in any way.

- Pour boiling water over the beans until the liquid reaches 1 - inch head space.
- Poke a butter knife, chopstick or similar down into each jar to release and de-bubble the jars.
- Using a clean cloth or paper towel that has been dipped in hot water, wipe the rims of each jar to make sure there is no salt or debris (this effects the seal of the jar, so don't skip this part).

- Add a lid and ring to each jar.
- Tighten the rings finger tip tight (which means once the ring stops turning freely, it is tight enough). This prevents the lids from buckling in the canner.
Process the Jars in the Pressure Canner:
You will process the green beans at 10 pounds of pressure
You will process the green beans at 10 pounds of pressure
20 min for Pints and 25 min for Quarts

- Add the filled jars to the canner (My pressure canner holds 10 Quarts or 16 Pints)
- Make sure you did not forget to add the 2-3 inches of water to the bottom of the canner.

- Make sure the sealing ring is inside of the lid. Place the lid on the pressure canner and lock it in place.
- You can see the arrows on the lid and handle so just match them up and twist the lid to line it up correctly. The gauge will show that the canner is at 0 pressure.
- Turn the burner on high and let the water inside the canner come to a boil until you see steam coming out of the air vent hole.
- Let the steam vent for 10 minutes before adding the regulator gauge on top of the air vent hole.
- Once the 10 minutes is up add the regulator gauge.
- The pressure canner will now start to build pressure.
- Watch the heat and lower the temperature as the pressure starts to rise close to the 10 pound mark because it can go fast after about 5 pounds.
- Once the pressure is at 10 pounds you need to lower the stove temp.
- Set a timer for 20 minutes for pints and 25 minutes for Quarts.
- You will need to play around with the heat and increase and decrease the temperature as needed to keep the heat regulated so the canner stays at 10 pounds for the whole canning process.

- When the pressure button is down there is no pressure in the pot, but when it pops up the pressure canner is pressurized (never open the canner until that button is down and the pressure dial is always at Zero.
- When the processing time is complete turn off the heat, leave the canner undisturbed (do not remove the weighted regulator) and allow the pressure canner to come down to Zero.
- Wait 10 minutes, remove weighted regulator and un-lock the lid tilting the lid away from yourself.

- Leave the lid cracked for an additional 10 minutes before removing the jars. If you remove the jars too quickly they will start to siphon.

- When the 10 minutes is complete, remove the jars using the jar lifter. Be careful because the jars are very hot.
- Place the jars on the counter on a thick dish towel to cool completely. You will hear the jars pop which means the jars are sealing.
- Allow the jars to cool completely for 24 hours before removing the bands.
- Check to make sure each jar has sealed by pushing down on the middle of the lid. It should not pop back.
- Rinse the jars and lid under water and dry.
- Label, date and store jars in a cool dry place for up to 18 months.

Look how pretty and green the beans are! You can really see the difference by using the Zinc tablets.

Note: If you are interested in what variety of green bean that we grow it's the Contender Bush Bean. Contender is our favorite variety because they're, dependable, string less, mature early and produce a large yield. They also do well in cool conditions and thrive well in hot weather which is perfect for Texas. We have grown them in the spring and the fall and they harvest equally well.
Hungry for more? Check out the Recipe Index by Mommy’s Kitchen.
Be social and follow along on Facebook, Instagram, Twitter and Pinterest! for all the latest updates!
Join the Mommy's Kitchen Mailing List and you'll get the latest recipes and updates delivered straight to your inbox for Free!
0 comments