
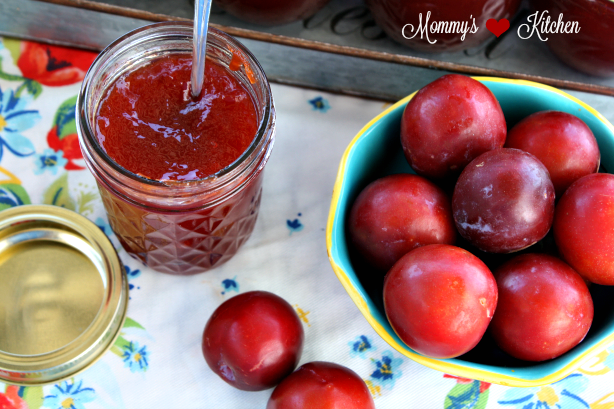
Fresh plums, sugar, pectin, water and butter make up this delicious old fashioned plum jelly.
The last couple weeks I have been busy in my kitchen freezing peaches and veggies and canning pickles, jellies, jams and relishes. I have to admit it's a lot of work, but it will be sooooooooo worth it when winter rolls around and my pantry and freezer are filled with summer's bounty.

If you've never had plum jelly you don't know what you're missing. Ever since making this jelly recipe I want to add some plum trees to our mini backyard orchard. There's still time to decide on what to add, so until then hopefully I can get future plums from our neighbor.


Lay a cheese cloth over a strainer and place the strainer over a large bowl. Pour the plum mixture into the cheese cloth and let the juice slowly strain through. When all of the juice strains through, I gather the cheese cloth together in the middle and give it a good squeeze to get out as much of the plum juice and pulp as I can.
Pour about 6 cups of plum juice back into the pot. Add the pectin, butter and sugar and stir well. Bring the mixture to a rolling boil, reduce heat to medium-low and simmer until the mixture reaches 220 degrees on a candy thermometer. Remove from heat and skim off any foam.


Lower the jars into the canner and process the jars in a hot water bath for 5 minutes for half pints and 10 minutes for pints.

Place the jars on a cloth covered counter until the jars are cool. Once cool, press on the top of the lids of each jar and ensure the jars are sealed (the lid should not move up and down when pressed). Store in a cool dark area.

Refrigerate open jars for up to 3 weeks (that is if it lasts that long).

Yield: 10 - 12 half pint jars
Homemade Plum Jelly
Fresh plums, sugar, pectin, water and butter make up this delicious old fashioned plum jelly.
Prep time: 1 HourCook time: 30 MinTotal time: 1 H & 30 M
Ingredients
- 7 lbs of fresh ripe plums
- 6 cups sugar
- 4 cups water
- 1/2 teaspoon butter (to reduce foaming)
- 1 package (1.75 oz) Sure Jell powdered fruit pectin
- 8 10 - sanitized 8 ounce jelly jars with lids and rings
Instructions
- To sanitize the jelly jars boil the jars for 10 - 15 minutes. Keep the jars hot until the jelly is ready to be poured in.
- Add the lids and rings to a small pot and cover with water. Bring the water to a boil and then turn off the heat and remove the pan from the burner. Leave the lids and rings in the pot until ready to use.
- Rinse your plums, making sure to remove any dirt, debris or stems.
- Cut the plums in half around the pit (do not remove the pits or skin) and place in a large stock pot pot.
- Add 4 cups of water over the plums and simmer over medium heat until the plums are tender and broken down, about 30 minutes.
- Stir every 10 minutes. As the plums are simmering I like to take a potato masher and mash the fruit as it cooks to release the fruit from the pits.
- You will notice the plums start to break down more and more as they cook.
- Lay a cheese cloth over a strainer and place the strainer over a large bowl. Pour the plum mixture into the cheese cloth and let the juice strain through.
- When just about all of the juice strains through, I gather the cheese cloth together in the middle and give it a good squeeze to remove as much juice and pulp as possible. Discard cheese cloth with pulp and pits.
- Pour approx. 6 cups of plum juice back into the pot. Add the pectin, butter and sugar and stir well.
- Bring the mixture to a rolling boil, reduce heat to medium-low and simmer until the mixture reaches 220 degrees on a candy thermometer. Remove from heat and skim off any foam.
- Ladle the mixture into hot sterilized jars leaving 1/4 inch head space. Wipe the rims of the jars clean and add the lids and rings.
- Process the jars in a hot water bath for 5 minutes for half pints and 10 minutes for pints.
- Place the jars on a cloth covered counter until the jars are cool. Once cool, press on the top of each jar lid to ensure the jars are sealed (the lid should not move up and down when pressed).
- Store in a cool dark area.
- For best quality, homemade canned jelly, when properly stored in a cool, dark, dry place should be used within 1 year of canning, but will remain safe to eat for longer if the seal remains intact.
- Refrigerate opened jelly for up to 3 weeks.
Notes:
The setting point for jellies and jams is (220F) so a good way to test for the setting point is to have a candy thermometer clipped to the side of your saucepan, with the end dipped into the boiling jam mixture. Once the boiling mixture reaches the correct temperature your jam will set up.

18 comments
instagram